
Also called a “DDS VFO.” This may be a bit of a brain dump. Although I have local notes (in Joplin), if I had to look hard for this stuff, maybe someone else can benefit from it. I’ll try to skip the details of the dead-ends I went down.
I put the Pixie kit I put together as a distraction from the thing that’s been bugging me, which is putting together some different modules in a receiver to 1) learn more about hardware and b) eventually design a radio orienteering receiver. (Why design when I can put together someone else’s design? Not sure yet.)
Building
In short, I took these building blocks and put them together:
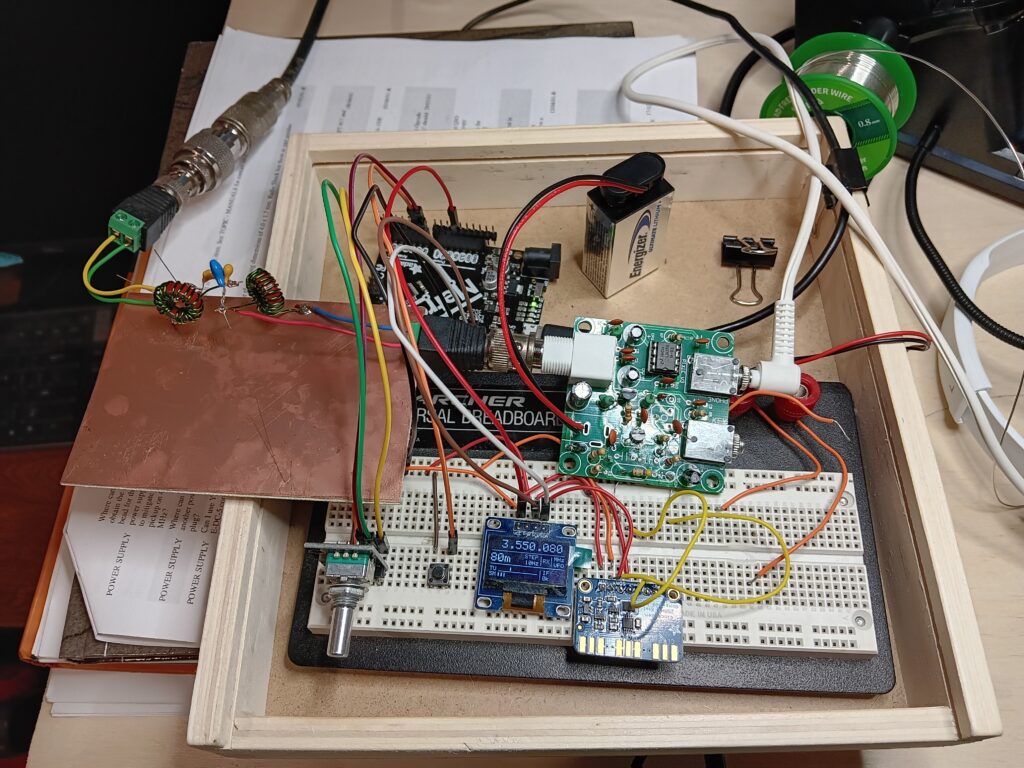
- Adafruit Si5351 breakout board to act as a local oscillator
- Adafruit Metro microcontroller development board
- Pretty generic OLED display (pulled from a TTGO T-Beam I originally got on AliExpress)
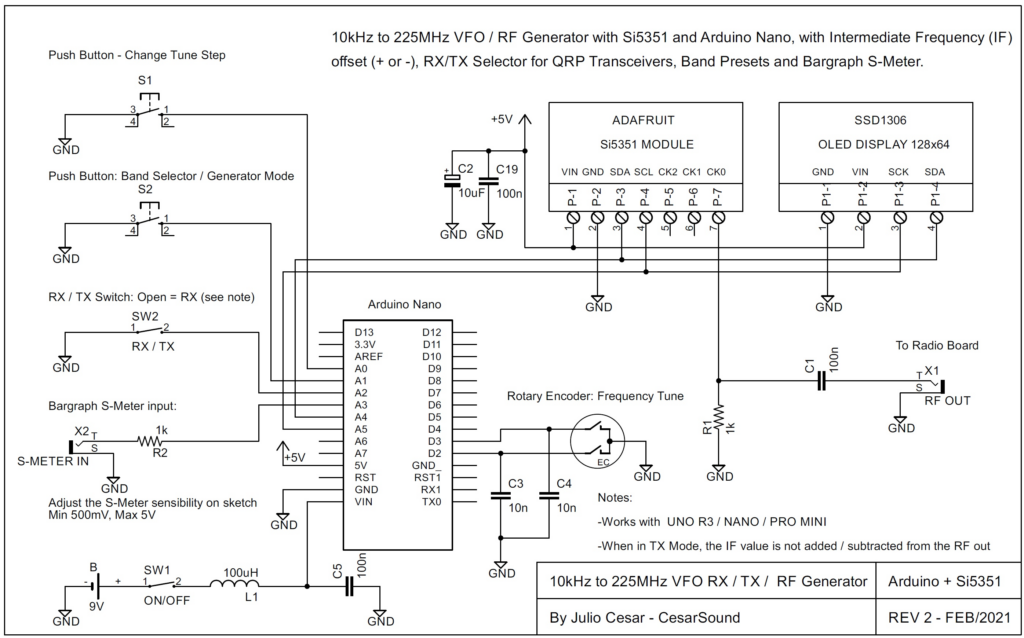
- Arduino code from CesarSound
- Pixie kit from AliExpress
- Rotary encoder with push button from eBay (affiliate link)
- Generic momentary contact button (originally from SparkFun kit)
- High-pass filter that I designed and need to blog about
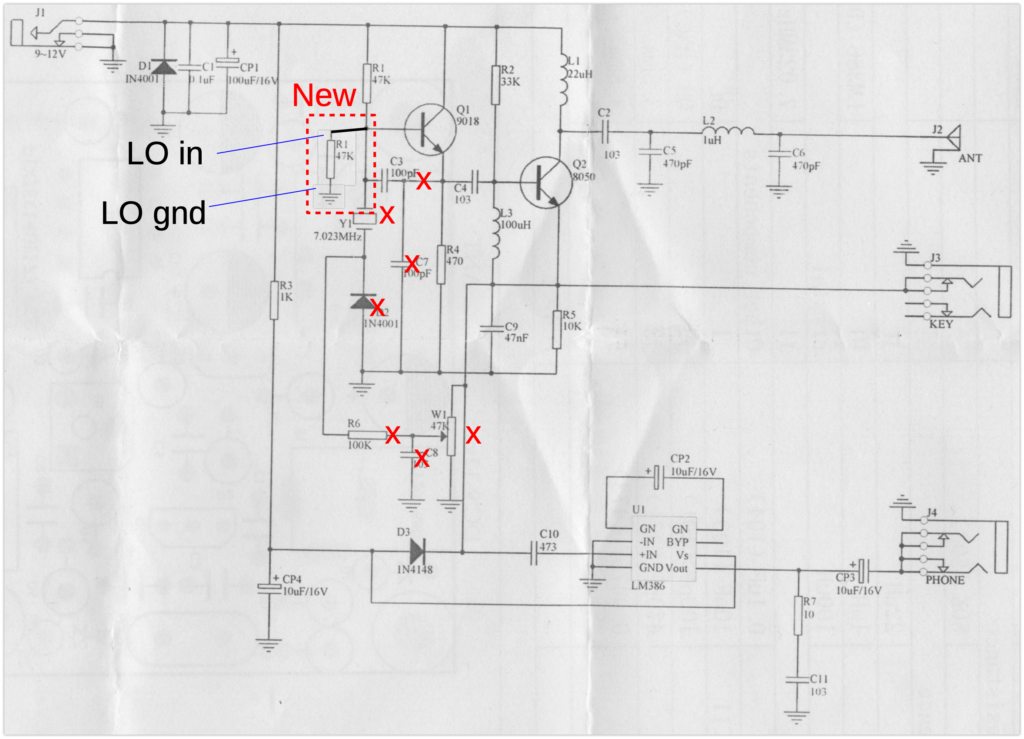
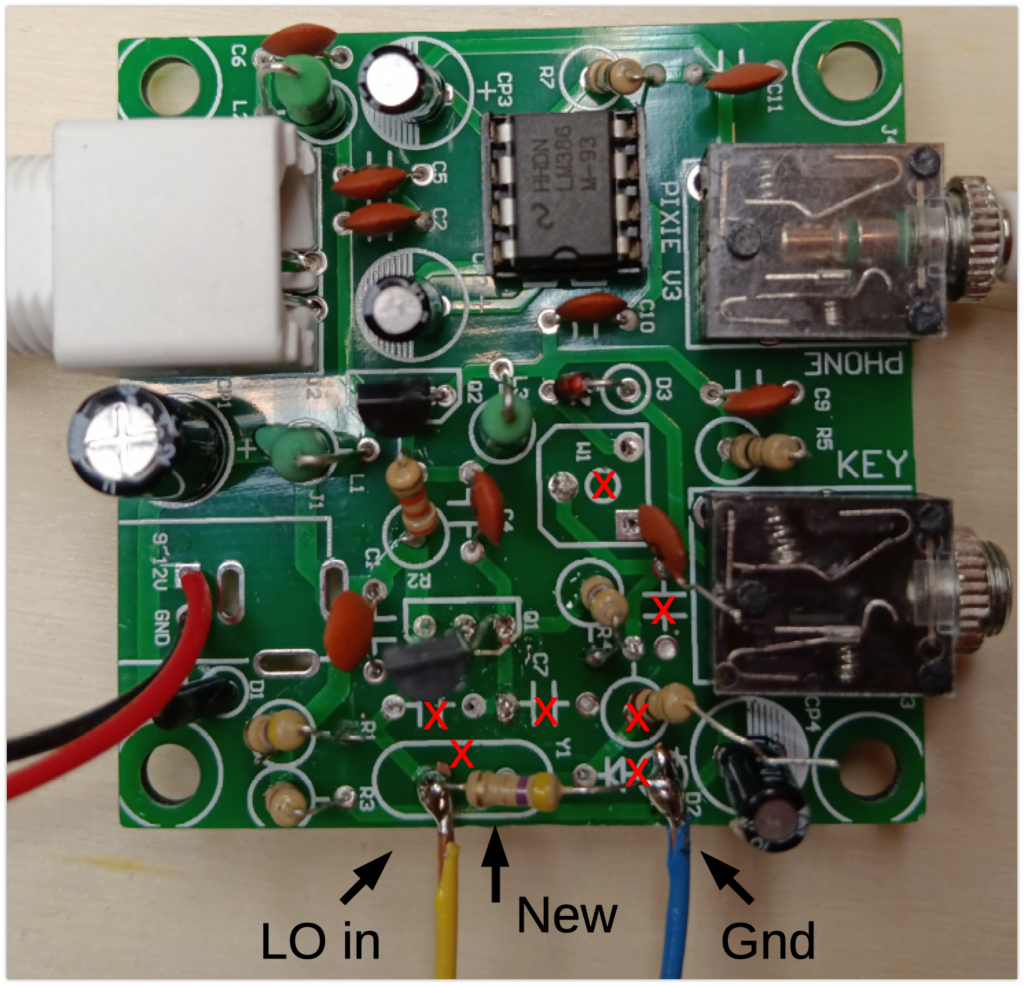
Although I don’t understand it all yet, the modification to the Pixie is explained at the very end of this “S-Pixie QRP Kit Student Manual.” Although I have the Pixie and not the S[uper]-Pixie, the component names matched the schematic I was provided with.
The S-Pixie can be modified to cover the whole 40 Meter band by replacing the oscillator with a VFO. A popular approach has been to use a Direct Digital Synthesizer (DDS) controlled by an Arduino. The human interface includes an LCD display and rotary encoder.
Popular DDS choices include the AD9850 and the SI5351.
Remove/Omit C3, C7, Y1, W1, D2, R6, and C8.
Place a 47K resistor between Q1 base and GND.
Connect the DDS across that resistor.
I don’t think I changed any of the code yet, but my version is here. I used the same pins CesarSound defined in the schematic below. I only used the connections from the Si5351 module, the OLED display, and the rotary encoder to the Arduino and ignored the rest. I skipped the capacitors across the rotary encoder connections.
Testing
I’m a bit overwhelmed, so you don’t get anything here right now.
here is where I talk about testing, maybe with audio/video
does it transmit
HPF to block broadcast AM – separate blog post
not great selectivity – hard to use for QSO
Next Steps
I have to keep reminding myself that this is not a product, it is a learning exercise. I do plan on making a standalone digital VFO module (with a board and case and all that) that can be plugged into other modules as needed. The digital VFO might use something smaller and cheaper than the Metro, like an ESP32 dev board, if I can get it to work. Pete N6QW has a bunch of information on this type of project.
The Pixie part may be modified/stripped down more so I can better understand it or re-use into another application.
Photos
@blog Make sure you check the waveform of the SI5351… Might require a little bit of filtering. they push out some square wave noise. (that said, they do work great as a VFO). The receive on a Pixie is going to be your issue (it's as wide as a barn door!). You can also use the Si5351 and throw it up against a mixer as a direct conversion receiver.
Remote Reply
Original Comment URL
Your Profile
Why do I need to enter my profile?
This site is part of the ⁂ open social web, a network of interconnected social platforms (like Mastodon, Pixelfed, Friendica, and others). Unlike centralized social media, your account lives on a platform of your choice, and you can interact with people across different platforms.
By entering your profile, we can send you to your account where you can complete this action.
Thanks Ben. Yes, I plan to work on another type of mixer next. This is my first attempt at building real modules, so I’m trying not to build faster than I can write things down.
ETA: It’s too bad your images don’t show up here on the blog. I wonder if that’s something I can fix or a plugin problem.
@blog Hmm, interesting, not sure how that works… Here's the direct conversion I built (under my prior call), I can dig up the QRP Quarterly article describing this… N6QW helped me through learning all of this, he's down the street from me. https://www.youtube.com/watch?v=AHmxh4PStT0
Remote Reply
Original Comment URL
Your Profile
Why do I need to enter my profile?
This site is part of the ⁂ open social web, a network of interconnected social platforms (like Mastodon, Pixelfed, Friendica, and others). Unlike centralized social media, your account lives on a platform of your choice, and you can interact with people across different platforms.
By entering your profile, we can send you to your account where you can complete this action.
@blog Great project, keep at it!
Remote Reply
Original Comment URL
Your Profile
Why do I need to enter my profile?
This site is part of the ⁂ open social web, a network of interconnected social platforms (like Mastodon, Pixelfed, Friendica, and others). Unlike centralized social media, your account lives on a platform of your choice, and you can interact with people across different platforms.
By entering your profile, we can send you to your account where you can complete this action.
Thank you!
@va3prr @blog I concur. I think this is a great project.
Remote Reply
Original Comment URL
Your Profile
Why do I need to enter my profile?
This site is part of the ⁂ open social web, a network of interconnected social platforms (like Mastodon, Pixelfed, Friendica, and others). Unlike centralized social media, your account lives on a platform of your choice, and you can interact with people across different platforms.
By entering your profile, we can send you to your account where you can complete this action.